Monthly Archives: February 2026

What is a MySQL database?

MySQL is one of the most popular and widely used Relational Database Management Systems (RDBMS).

Many web applications such as forums, content management systems, etc. use a database to store data (content). The majority of web applications that use databases require a MySQL database to operate.

For example, the popular web applications Joomla, Drupal, osCommerce and WordPress store their data in MySQL databases.

It is almost guaranteed that if your web application (especially those written in PHP) requires the use of a database, then it will need exactly a MySQL database or will at least support MySQL.

To be sure, however, check the technical requirements of the web application. The data in a MySQL database is structured in tables which consist of columns and rows.

Whenever your script (application) needs to access specific data, it “asks” (makes query) the MySQL database for the content of a specific field (the intersection of a column and a row in a table).

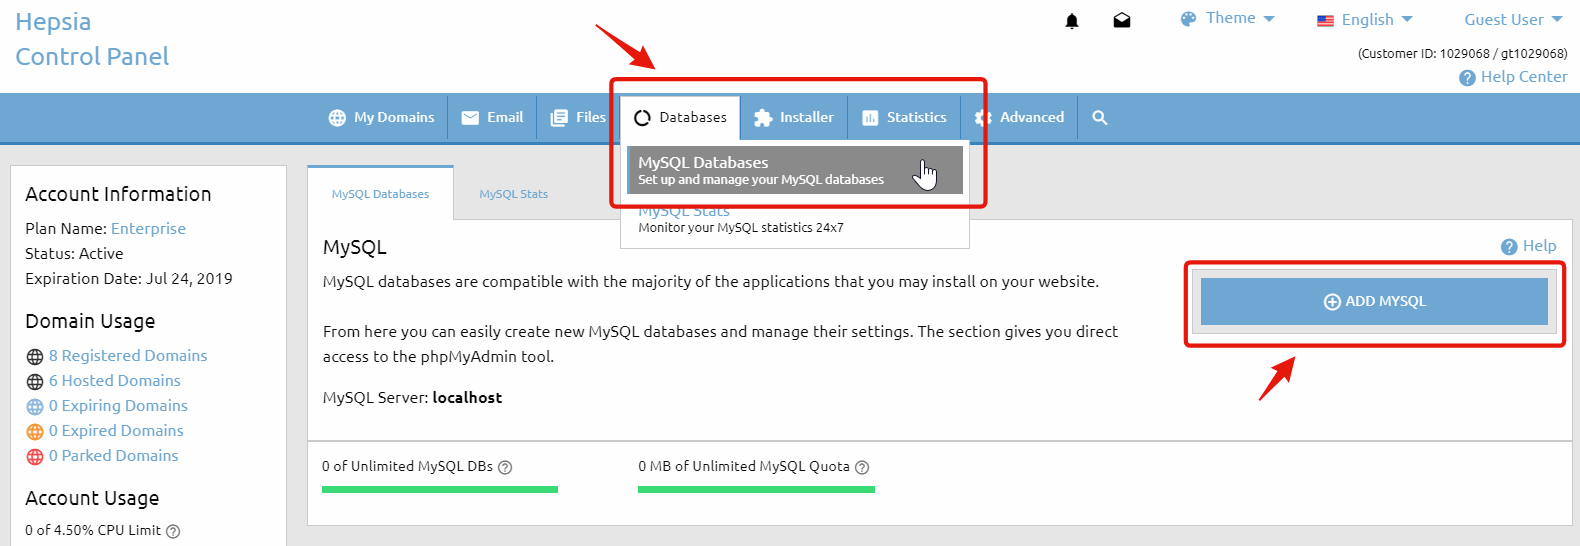
To create a MySQL database in your hosting account, go to the Databases > MySQL Databases section and click on the Add MySQL tab, on the right side of your Control Panel. 


Add MySQL Database

Usually a separate database is created for each web application that you install. Thus, the web applications can be managed easier.

In the MySQL Databases section you can also see a list of all MySQL databases that you have.

Note that the database name and the username are the same. For example, if you have a database whose name is account_database, then the username for the database will be account_database and vice-versa.

On our servers a database can only have one user (that is created by default) and new users cannot be created. The default user of the database has all the priviliges.

When you set up a script to use one of your databases you need the database name and username (which are the same, as mentioned above), the password and the MySQL host/server. You can find the MySQL host under the table with your existing MySQL databases. It is usually localhost.

What is an FTP account and (why) do I need different FTP accounts?

File Transfer Protocol (FTP) is a standard network protocol used to exchange and manipulate files over a TCP/IP based network, such as the Internet.

In other words, FTP offers a convenient and fast way for uploading or downloading files to and from the server.

In order to establish an FTP connection you need to have an FTP account on the server.

For more information you can read the article How to connect via FTP and upload/download files?

The FTP account is basically a set of a username and a password that authorizes access to the server via FTP.

The default FTP account that is created when your hosting account is set up provides access to the main /www/ folder of your web hosting account.

You also have the option to create new FTP accounts and you can do that via the FTP Manager section of your Control Panel (Files > FTP Accounts).

What is more important is that for each FTP account you can set an access path.

This way the newly created account provides access to a certain folder and its sub-folders, while all other folders are inaccessible.

That is useful if you wish to provide access to a third party (for example a web designer) to upload to your account without providing full access to that web hosting account.

What is CPU usage and how do I monitor it?

The Central Processing Unit (CPU), or processor, is the portion of a computer system that carries out the instructions of a computer program.

CPU time is the amount of time a computer program uses while processing CPU instructions.

The CPU time is often measured in seconds, while the CPU usage – by the percentage of a specified overall capacity.

In terms of your web hosting account, CPU usage is the percentage of the capacity of the server’s CPU that your account is generating.

Each web hosting account has a certain CPU usage limit. You can find out the exact CPU limit in the Account Usage table located on the left side of the Control Panel.


Account Usage table - CPU usage

You can monitor the CPU usage of your account via the Statistics > CPU Stats section of the Control Panel.

Once you open that menu, the CPU usage table is displayed. By default, the monthly account usage is displayed.

The columns in the table are as follows:

Day – you can click on each date for detailed information.

CPU Time – the amount of time the CPU has been processing instructions on behalf of your web hosting account.

Execution time – the amount of time applications from your web hosting account have been running.

CPU Usage – the percentage of the capacity of the server’s CPU used up by applications from your web hosting account.

Average Memory – the server memory used up by applications from your web hosting account during the execution time.

Processes – the number of processes that have been running during the reviewed period.

If you click on a particular day, you will see the same set of statistics displayed on an hourly basis.

It is recommended that you review other articles about CPU usage that provide detailed information on how it is calculated, how it affects the account and how to reduce it.

You also have the option to purchase additional CPU usage. For more information, please review the article “How can I upgrade my hosting plan?“.

What is a dedicated IP and do I need one?

An Internet Protocol (IP) address is a numerical label that is assigned to devices participating in a computer network. An IP address serves two principal functions in networking: host or network interface identification and location addressing.

The role of the IP address has also been characterized as follows: “A name indicates what we seek. An address indicates where it is.”

By default, your hosting account and all the websites you have with us use the shared IP address of the server – meaning that many websites on the same server reside under the same IP address.

You have the option to use a dedicated IP address and your domain or subdomain will be the only one corresponding to this IP address.

In other words, the dedicated IP address will be reserved just for you not only on our server and network but worldwide on the Internet.

One of the main uses of dedicated IP addresses concerns the installation of SSL certificates that are required for secure pages.

If you want to have a form on the website that will collect sensitive information, for example, for payments or client accounts, it is advised to have that page secured in order to protect the personal or financial information of your visitors and clients.

Another purpose of using a dedicated IP address is if you need to open your website using the IP address as a URL instead of using the domain or subdomain it is hosted under.

For more information on how to purchase, request and assign a dedicated IP address, please refer to the article How do I get a dedicated IP for my domain/subdomain?

How do I host a domain name?

You can host multiple* domain names in a single hosting account with us. The first domain name that will be hosted in your account is specified during the signup procedure. In order to properly host additional domain names, go to My Domains > Hosted Domains section, click the “Host Domain” button and follow the steps:

1. Make sure the option “Host Domain” is selected.
2. Type in your domain name, e.g. my-best-domain.com

*The domain name must be registered and the name servers must be changed with the ones specified in the Hosted Domains section.

Note: the “Don’t manage DNS” option has to be selected ONLY if you wish to use third party name servers for your domain name and just point it to this account using A record redirection. Otherwise leave that box unchecked and set our Name Servers (NS) for your domain.

Each domain name servers are managed from its Registrar – the company, where you have bought the domain from. If your domain name has been registered from this hosting account, its name servers could be managed from My Domains > Registered Domains.

3. Advanced Settings – this section is optional. Please leave the default settings if you are not sure what to do.

4. Click „Add a Host“ to host your domain in your hosting account.

Once you add the domain name, a red icon will be displayed under the NS column. Once the name server changes propagate (this may require up to 24 hours), the DNS status will be updated as well. More information on that matter is available in the article: Why is there a red icon sign (DNS error) for my domain’s name servers?

* Please have in mind that in order to host additional domain names, you must make sure that your hosting plan can support it. For that you should refer to the Account Usage table available on the left side of the Web Hosting Control Panel.

There you can see the number of domain names that you are currently hosting and the number of the domain names that you can add. If the available amount is zero, you must upgrade your account in order to host more domain names. You can find more information in the article How do I upgrade my hosting account?

How to create a subdomain?

Subdomains are basically separate hostnames that are part of a larger domain.

 For instance, “example1.my-best-domain.com” and “example2.my-best-domain.com” are subdomains to the larger domain “my-best-domain.com“.

You can have a further subdivision – “english.example1.my-best-domain.com” and “spanish.example1.my-best-domain.com” are subdomains to “example1.my-best-domain.com“.

In theory, this subdivision can go down to 127 levels deep, and each one can contain up to 63 characters, as long as the whole domain name does not exceed a total length of 255 characters. In practice, some domain registries have shorter length limits than that.

Subdomains are commonly used to assign a unique name to a particular department, function, or service related to the main site or organization. For example, the forum on a given website can have its separate subdomain – forum.my-best-domain.com.

From the Hosted Domains area of the Control Panel, you can create a subdomain for a domain name that is already hosted in your account. 

Here are the steps to follow:

  1. Click on the “Create a Subdomain” button on the top right and make sure the option “Create a Subdomain” is selected.
  2. To create the subdomain webmail.my-best-domain.com, type in “webmail” and select “my-best-domain.com” from the the drop-down menu, containing all hosted domains.
  3. Advanced Settings – this section is optional. Please leave the default settings if you are not sure what to do. (Read further below to learn more about the Advanced settings)
  4. Click “Add a Host” to create the subdomain. The new host will need about 10 minutes to start working.

Here is what the Advanced settings are about:

Path: this field enables you to choose the folder that the subdomain will point to. By default that is: /www/subdomain/. For instance, the default path to example1.my-best-domain.com is /www/example1.my-best-domain.com/. 

IP Address: here you have a dropdown menu that enables you to select the shared IP address of your account or assign a dedicated IP address for that particular subdomain. For more information on dedicated IP addresses, please refer to the respective articles in this knowledge base.

After that you have the option to specify a custom error page for errors 400/401/403/404. You can also use the system (Apache) page or the default error pages.

Secure Socket Layer (SSL): this option enables you to use secure pages on this subdomain. For more information on SSL, please refer to the respective articles in this knowledge base.

ModSecurity: the ModSecurity firewall option allows you to protect your subdomain-installed applications from most common hacker attacks; 

Further below you have the option to Activate Access & Error Logs. The Access Logs show you when the subdomain was accessed and by what IP address. The Error Logs show when and what errors occured on the subdomain.

You can see all subdomains in your account listed in the table of hosted domains.

In this table, you can find the following information per subdomain: the current name server status, the number of pertaining mailboxes, an indicator if an SSL certificate is installed, an indicator if DNSSEC is enabled, a button that will open the folder that this subdomain is pointed to, a button to check the traffic stats for this subdomain, a button to edit this subdomain and finally a button to delete this subdomain.

IMPORTANT: The “www” subdomain is the default subdomain of your domain. You cannot delete the “www” subdomain. Instead, you can simply delete the domain name from the Hosted Domains section of the Control Panel. Editing the “www” subdomain also updates the domain name itself. In other words, if you want to edit the domain name my-best-domain.com, then simply edit the www.my-best-domain.com subdomain.

Understanding Recurring Payments at SharkASP

At SharkASP, we focus on stability, ease of use, and keeping your online services running without interruption. To help you avoid missed renewals and unexpected downtime, we offer an automated recurring billing system for hosting plans, domain names, and service upgrades. This system ensures timely renewals while giving you complete visibility and control over your subscriptions.

Below is a detailed explanation of how recurring payments function, when renewals are processed, and how you can manage or update your billing preferences.

How SharkASP Recurring Billing Works

When you purchase SharkASP services—such as web hosting, domain registration, or plan upgrades—using a credit/debit card or PayPal, a recurring billing subscription is automatically set up for the next billing term.

This subscription enables automatic renewal of the selected service, ensuring your account remains active without requiring manual payment each cycle.

  • Card payments: Subscription details are included in your payment confirmation email.
  • PayPal payments: PayPal sends a separate email confirming the recurring authorization.

Early Renewal Processing for Maximum Uptime

To minimize the risk of service disruption, recurring payments are processed seven (7) days before the actual renewal date. This advance billing window helps prevent issues such as expired cards or insufficient PayPal balances.

If a renewal attempt is unsuccessful, you’ll receive an immediate notification and have seven additional days to resolve the issue before any service interruption occurs.

Viewing or Canceling Your Subscription

You can review or cancel any active recurring subscription at any time through the SharkASP Control Panel:

  1. Hover over your account name in the top-right corner
  2. Select Recurring from the menu

If your subscription was created via PayPal, you may also manage or cancel it directly from your PayPal account dashboard.

Updating Your Payment Method

If you’d like to keep your recurring subscription active but change the payment source, follow these steps:

  1. Go to the Recurring section in your Control Panel
  2. Click Change next to the subscription
  3. Choose your new payment option:
    • PayPal
    • FirstData (credit/debit cards)
    • WorldPay (American Express)

You’ll be redirected to a secure authorization page to complete a $0.00 verification transaction, which confirms approval for future automatic renewals.

Final Thoughts

The SharkASP recurring payment system is designed to simplify account management while protecting your websites and domains from accidental expiration. With automated renewals, early billing, and flexible payment controls, you can focus on building and growing your online presence with confidence.

If you ever need assistance, our support team is ready to help—so you can continue enjoying the performance, reliability, and security that SharkASP hosting provides.

How can I change the payment method for an automatic renewal?

A manual payment is required to create a subscription for the next billing period of any domain or hosting plan.

You can view or cancel your subscriptions at any time from your Control Panel. Simply hover over your name in the top-right corner and select Recurring.

If you wish to keep the subscription but change its funding source, go to the same section and click Change. A small pop-up window will appear, allowing you to choose a payment method: PayPalFirstData (credit and debit cards), or WorldPay (American Express cards).

After proceeding, you will be redirected to the payment page, where you must submit a $0.00 payment. This manual payment acts as an authorization, allowing us to automatically charge your selected payment method when your domain or hosting plan is due for renewal.

How can I renew my hosting plan for more than a year?

Our payment processors allow us to take payments for one year at a time only.

You can renew the hosting plan for a few years, but you will have to make a separate payment for each year.

A quicker way would be to fill your client wallet with the needed amount and then use the “Wallet” payment option on the payment page.

This will save you the time and efforts needed to enter your card details a few times in a row. 

How can I disable the ID protection for my domain name?

If the contact details for any of your domains are currently hidden by WHOIS Privacy Protection and you need to make them visible, you can easily disable this feature from your client area. To do so, navigate to My Domains > Registered Domains > WHOIS Privacy Protection, then locate the domain you wish to manage and click the ID Protect icon next to it.

A small pop-up window will appear, allowing you to disable privacy protection for that specific domain. Once disabled, your domain’s registrant, administrative, and technical contact information will become publicly visible in the WHOIS database.

Please keep in mind that disabling WHOIS Privacy Protection may expose your contact details to the public, which can result in increased spam emails, phone calls, or unwanted solicitations. In some cases, however, turning off privacy protection may be required for domain transfers, ownership verification, SSL certificate validation, or compliance with certain third-party services.

You can re-enable WHOIS Privacy Protection at any time by following the same steps, provided the service is available for your domain extension.