You can create mailboxes at any of your hosted domains.
To create a mailbox go to Email > Mailboxes in your Control Panel. On the right you see a Create A New Email Account button.
After you click on it, you see several text boxes that you need to be filled in.
Email address – Here you enter the name for your mailbox, which is the part of your email address before the @. Next you choose one of your hosted domains from the drop-down menu on the right. The domain would be the part of your email address after the @.
Password – Here you need to enter the password for your mailbox. You will be using this password to login to the webmail and also when you setup your email account in Outlook and other email clients. You can enter a password using the symbols a-z and 0-9. The password should be between 3 and 32 symbols long. You can use a random password by pressing “Generate password” button.
Forward email – If you select this option, you will be able to enter an email address where all messages received in your new mailbox will be forwarded to. There is also a “Save a copy” option. If you select it, a copy of every message that is forwarded will also be saved in this mailbox. You will be able to setup email forwarding later.
Use Autoresponder – Select Auto-Reply option if you want to enter an auto-reply message, which would be sent back to anyone who sends you an email. Usually this option is used to setup a message informing people that you are on vacation, for example, so it is unlikely that you need this right now. You can setup an auto-responder at any time. (see: How to set an auto-reply message to my e-mail account?)
When you are ready, you can click the Add a Mailbox button to create the mailbox. It will appear in the list of Mailboxes.
SPF (Sender Policy Framework) is a way to prevent sender address forgery in emails. SPF will not directly stop SPAM (junk email).
It will give domain owners a way to define which mail sources are legitimate for their domain and which ones are not.
To enable SPF for your domain, go to the Email > SPF Manager section of your Control Panel.
Choose the exact domain name you wish to protect and switch the Status to ON from the drop-down menu next to your domain name.
If you’re using our mail service, all you need to do is check the box labeled “Allow my domain’s MX records only” under the IPv6 field—that’s it!
This means that only the MX records stored for your domain name in the DNS zone will be able to send mail on behalf of your domain name.
If not, here are the required settings for each field:
Hosts: Fill in a list of all the hosts, which are authorized to send mail on behalf of the chosen domain name, e.g. mail.my-best-domain.com. Separate the hosts with a space or a comma.
IPv4: Type in the IP address of your SMTP mail server (e.g. mail.my-best-domain.com). Please have in mind that most of the mail servers have more than one IP address and in order to determine all of them, you can use an online tool like the one at https://www.whatsmydns.net/.
IPv6: Leave this field blank.
Once all the above is done, click on the Edit SPF Protection button. Please note that the SPF Record propagation may take up to 24 hours.
Here are step-by-step instructions on how to move your emails from the previous hosting provider:
Option 1: Works in all cases (does not require assistance from your current/old provider)
Set up an IMAP account for each of your mailboxes, using a mail client like Outlook, Thunderbird, etc.
If you are not sure, ask your old hosting provider what the IP of the IMAP mail server you need to connect to is.
Detailed information on how to set up a POP3 account could be found in the email related articles.
Step 1: Download all your emails locally (including all the folders that you might have, like Sent, Draft, etc.) to your computer using the IMAP accounts.
Step 2: Update the domain name servers (if you haven”t done it yet) to the ones listed in the Hosted Domains section of your hosting Control Panel.
Step 3: Create all the mailboxes that you will be using via the Email Manager section of the Control Panel.
Step 4: You will now have to create IMAP accounts in your mail client for each of the mailboxes. Please note that the previously created IMAP accounts must remain – do not delete them yet!
Step 5: Once you have the two IMAP accounts for each mailbox, just drag and drop all the messages and folders from the IMAP account with the old hosting provider to the new one. This way you will upload all the emails from your computer to our mail server.
Option 2 – May requires assistance from your current/old provider
Step 1: Check with your old hosting provider if you can have access to the /mail/ directory. There should be folders for each of your email accounts that you have to download to your computer.
Step 2: Create all the mailboxes that you will be using from the Email Manager section of your Control Panel.
Step 3: Upload all mailbox folders to your hosting account with us, using FTP. The folders could be uploaded directly to the /www/ directory. Each of your mailbox folders (e.g. mail@my-best-domain.com) should contain the following sub-folders: “cur” and “new”.
Step 4: Go to the File Manager section of the hosting Control Panel and navigate to the directory which contains the uploaded folders from the old hosting provider.
Copy all the files as follows: – from /www/uploaded-mail/mail@my-best-domain.com/cur/ to /mail/mail@my-best-domain.com/cur/ – from /www/uploaded-mail/mail@my-best-domain.com/new/ to /mail/mail@my-best-domain.com/new/
If you experience problems – check if /mail/mail@my-best-domain.com/ and the subfolders have permissions 755.
Log into the mailbox and see if the messages were copied successfully.
Sometimes when you install a script manually, you would see an instruction “change the permissions of file.php to 666“, for example.
Those permissions are associated with the read, write and execute rights that the file owner, group members and everybody else has for that file.
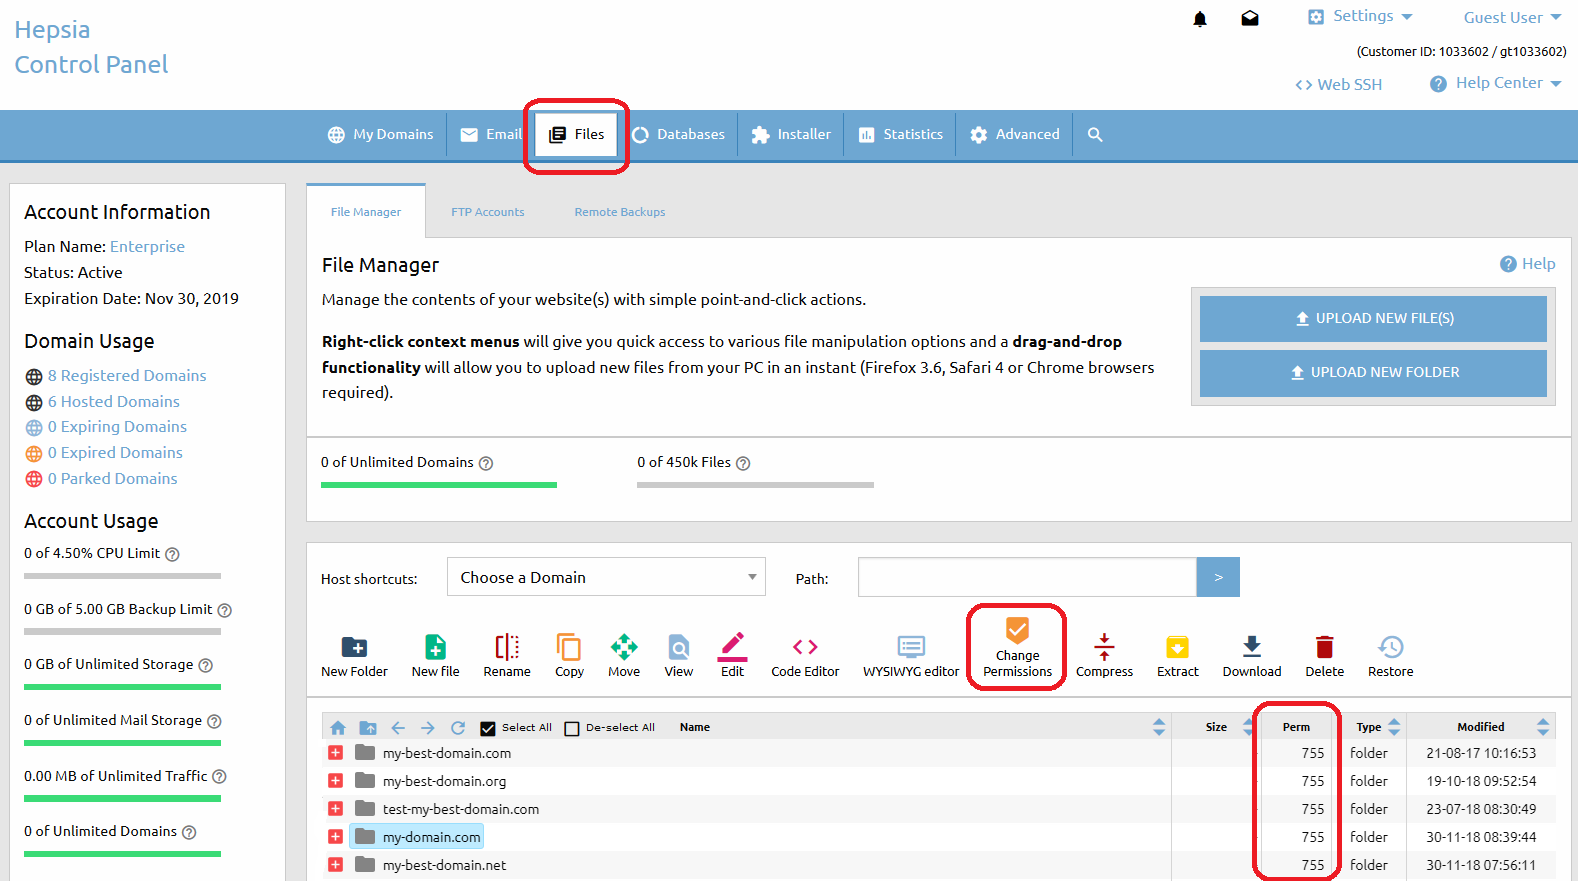
There are several ways to change the permissions of a file or a folder – through the File Managersection, SSH, or through an FTP client, such as FileZilla.
If you go to the File Manager section of the Web Hosting Control Panel (Files > File Manager), you will see a column “Perm“.
There is a value for every file or folder in your account, with default values 644 for files and 755 for folders.
If you want to change the permissions of a particular file or folder, simply click on the Change Permissions icon from the top list menu or click right button of the mouse. A drop-down menu will appear and you have to choose Change Permissions. A small window will show up and you’ll be able to choose the new value.
If you want to change the permissions of multiple files or folders, you have to select them first, then select the Change Permissions icon located at the top of the File Manager section.
Click on the Change button for the changes to take effect.
An alternative to using our File Manager tool would be changing the file permissions using an FTP client.
That option would also give you the opportunity to change the permissions of all subdirectories and files within a folder recursively.
We recommend FileZilla, a freeware FTP client. Here is how you can change the permissions using that client:
First, connect to your account on the server via FTP to see a list of all the files and folders that you have.
To change the permissions, right-click on a file and choose the File Attributes option. You can type a numeric value or choose the Read/Write/Execute permissions marking the checkboxes.
If you choose the File Attributes option when you right-click a folder, you will see an extra option – Recurse into subdirectories.
You can change the permissions of all the files, all the folders, or both, as long as they are located in the folder you have just clicked on.
Last, but not least, you can change the permissions via Secure Shell (SSH) if it is active for your account. The command is:
Uploading a lot of files to your hosting space could be a burden if your Internet connection gets interrupted.
Besides, your FTP client opens a new connection for each file in the upload queue, thus taking more time for the files to upload.
The more the files you are trying to upload are, the longer the upload time will be. For that reason, we have included a useful function in the File Manager tool in your Web Hosting Control Panel – unzipping an archive that has been uploaded on the server.
If you want to upload a whole website, you can archive it using a freeware archivator like WinRar or 7Zip.
Upload the file in the corresponding folder, for example /www/my-best-domain.com either via FTP or via the File Manager (Files > File Manager) tool.
Then open the File Manager tool and navigate to the folder where you uploaded the file. You should see the archive that you have just uploaded.
Right Click on the file name – a small window opens, prompting you what you would like to do.
All options are listed in a drop-down menu.
You can open the file with a WYSIWYG editor, a plain text editor or in a browser.
To unpack the archive file in the current folder, you have to select the Extract option.
You can also zip (create an archive) a whole folder by clicking on the Compress icon. The supported archive file types are .zip, .rar, and .tar.gz.
By choosing the Zip/Archive option from the drop-down menu, you can create a zip file of all the files within that folder, making it easier to download the entire folder at once.
There is a tool that allows you to set password protection for a specific folder. Just go to the Advanced > Password Protection section of the Web Hosting Control Panel.
Click on the New Password Protected Area button.
Select your domain from the “Drop-down menu” or type the full path to the protected folder in the “Path” field (e.g. /www/my-best-domain.com/protected_folder). Enter the username and the corresponding login password. Click the Add PPA button to confirm.
If you need to set more users, repeat the above steps, just use different usernames.
IMPORTANT: If there is an .htaceess file within the protected folder, the protection would not work, so either remove it or consider another password protection technique.
As a customer-oriented company, we strongly believe that the quality of our services should exceed clients expectations at the lowest possible price.
On account of this, our management team decided to have all our servers running on the open-source platform called Linux – an Operating System that has gained tremendous popularity in the last several years among desktop users, as well as impressive growth on the server market.
This in turn has attracted more interest in the development of reliable and inexpensive (free, in most cases) products ranging from desktop applications and office suites to high-end database solutions.
The MSSQL and Access databases, developed by Microsoft, run exclusively on Windows-based servers, such as Windows Server 2003 and Windows Server 2008.
To be fair, there are applications that could theoretically provide MSSQL and Access support under Linux with questionable results and none of those meet our quality standards.
The alternative our company offers is MySQL – the fast, cross-platform database from ”MySQL AB”. Its portability means that you can use it on a variety of Operating Systems – Windows, Linux, Unix, Apple XServe, IBM mainframe, and many more.
If you have already developed your application using a MSSQL or an Access database, we can recommend you the following three options for conversion to MySQL:
Option 2: Microsoft Data Transformation Services (DTS). Microsoft has included a data manipulation tool within the SQL server. It provides options for data export in various formats and systems. For more information on how to use this feature, please refer to these documents from Microsoft.com:
Option 3: Similar to Microsoft DTS, Access has its own tool for table export in many formats (including ODBC). All you need to do here is right-click the table in Access and select ‘Export’. A new wizard will appear, guiding you through the conversion process.
The domain”s EPP transfer authorization key must be provided (if the given TLD supports such) – it could be acquired from the domain name’s current registrar (For more information, please refer to: EPP (authorization code))
The transfer verification emails must be responded to – they are sent within 24 hours after the domain transfer is initiated to the Administrative Contact email address specified in the WHOIS record of the domain name
Once the domain transfer is confirmed by following the instructions in the transfer verification email, the transfer procedure becomes fully automated and may take 3-5 business days to complete.
Some specific domain types (TLDs) have different requirements for transferring a domain name. Some TLDs cannot be transferred at all.
However, the afore-mentioned requirements are valid for the majority of the TLDs (domain extensions).
With the growing number of websites on the Internet, it is becoming harder and harder to find a suitable domain name to register – one that is short, simple, to the point, and easy to remember.
That’s why, if you come across such a domain name that is suitable for your business or personal website, it is recommended that you register it right away.
Even if your website is not ready yet. You can register unlimited domain names through your account with us and there is no need to host them all. To find more information on hosting a domain name, please refer to the article: How do I host a domain name?
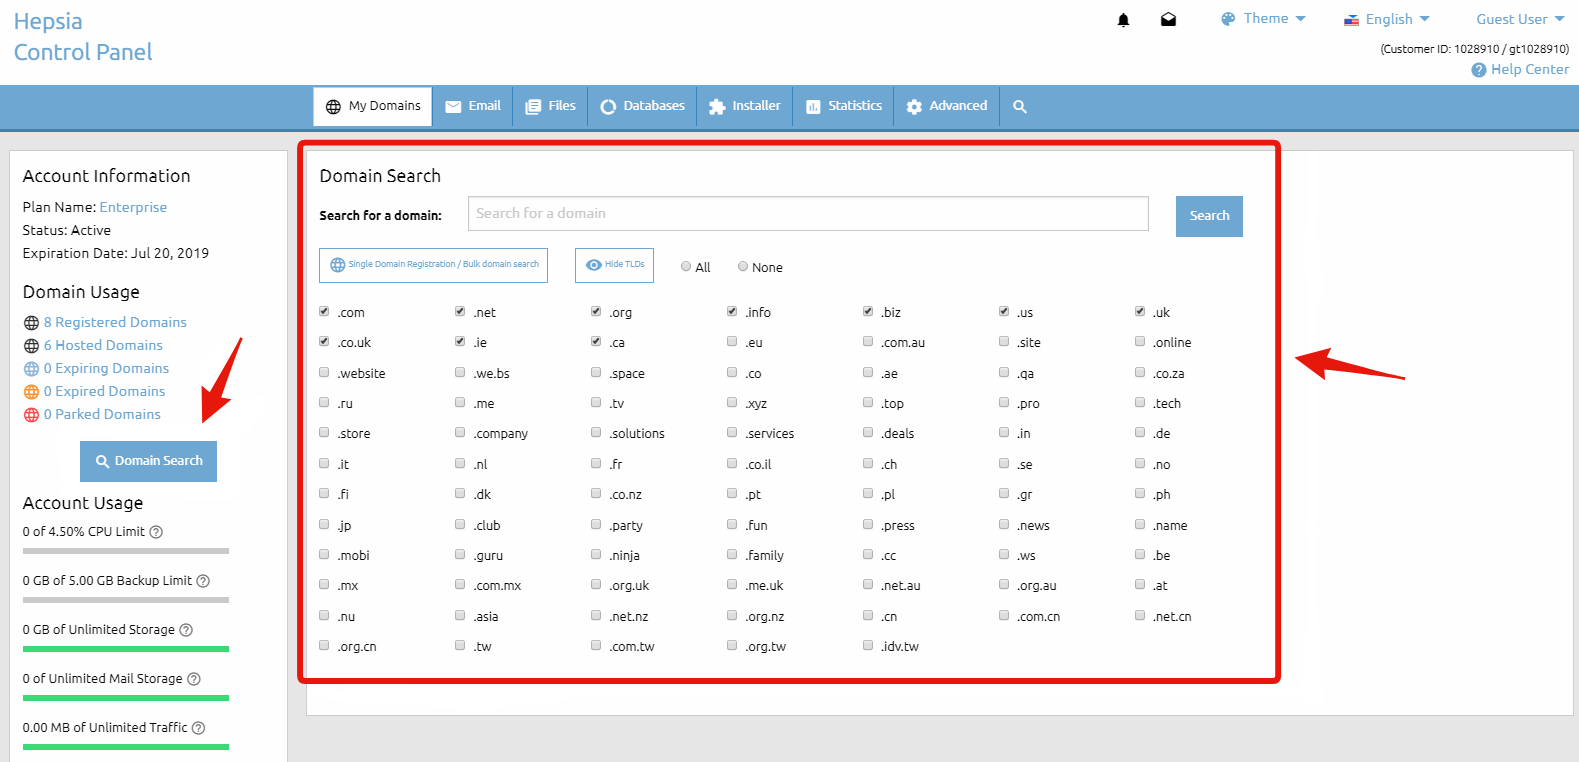
You can easily register a domain name via the Registered Domains section (My Domains > Registered Domains) of the Web Hosting Control Panel. Once you open that menu you should click on the Register/Transfer Domain button on the right-hand side.
To find our Domain Search form, click on the Domain Search button on the left sidebar of the page. This form will help you find an available domain name for you to register. In the section that is titled Search for a domain: you should input the domain name that you would like to register (what you enter will replace the predefined text my-best-domain.com).
Below that you have a list of all domain types (TLDs) that we can register and you have the option to select and deselect any of them. That way you will be able to choose what domain TLDs to search for.
After that you must click on the Search button. That will execute a search based on the parameters that you have provided and you will be forwarded to the next page Domain Search Results to see the results.
If a domain name is available for registration you will see a Register button next to it. If you are trying to register a domain name, yet only a Transfer option appears, this simply means that someone else already owns the domain name and it is not available for registration.
If you own this domain name you can transfer it to our company by selecting the Transfer button. For more information on transferring a domain name, please refer to the What is a domain transfer? article. If you find the desire domain(s) you have to click on the Proceed with the order button.
On the next page, you also have the option to make a new search if the results from the initial one are not satisfactory. You can keep modifying the search parameters until you find a domain name that you wish to purchase.
There you will find a checkbox named Host this domain name with us. This gives you the option to immediately host the domain name after you submit the payment for the registration. If your current hosting plan does not allow hosting more domain names, you will be provided with the options to purchase an additional hosted domains upgrade or upgrade to a higher package, if one is available.
As soon as you find the domain name that you are looking for and you are ready to proceed with the registration, you must click on the Register button. That will take you to the next step – the contact information for the WHOIS record. Please make sure that you provide accurate contact details. This information will be publicly available.
For some domain TLDs you can purchase an additional service – WHOIS protection (also called ID protection) – that will conceal and protect your contact information. For detailed information about that service, please refer to the What is WHOIS ID protection? article. Once you fill out the registrant section, and if you wish to use the same contact information for all the other sections, there is an option to copy the same information in the other sections as well.
Before proceeding any further, you must agree with the Domain Registration Terms, the Domain Resolution Policy & the eNom Registration Agreement. It is recommended that you familiarize yourself with these documents.
And last, but not least, you need to choose the payment method you would like to use and then click the Continue button on the right to proceed to the payment page, where you will enter your payment information. If none of the listed payment options is suitable for you, please refer to the How to Pay Without a Credit/Debit Card or PayPal article.
When you register a domain name you reserve the name for a period of time (usually a year or two).
It is not necessary to have your domain name registered with the same company that would be hosting your website (and thus your domain).
However, you have to point the domain to your hosting space to make it work properly. This is done by applying your hosting company’s name servers to your domain name.
Inside the domain control panel provided by your registrar (the company you registered the domain with) you should have the option to change the name servers, which may also be referred to as NS or DNS change.
To properly host a domain registered with another company with us, you must:
Add the domain to your Hosted Domains list (My Domains > Hosted Domains)
Set our name servers for your domain
Wait for the name server change to propagate (usually within 12-24 hours)